7 Tips for Choosing the Right Curing Adhesive?

Choosing the right Curing Adhesive is rarely a simple product comparison. It is a decision about light, heat, moisture, substrates, and production speed. A clear liquid may look ideal under factory lighting, yet fail inside a shaded joint. That detail matters.

Grand View Research valued the global adhesives market at approximately USD 72.3 billion in 2023. Its report expects continued growth through 2030, supported by electronics, automotive, packaging, and medical applications. MarketsandMarkets also projects strong expansion for UV curing adhesives, driven by faster processing and lower solvent use. These figures show opportunity, but they do not guarantee suitability. A growing market can still hide expensive mistakes.

Dr. H. William Dillard, a recognized adhesive-bond durability researcher, has emphasized that adhesive performance must be evaluated under the real service environment. His practical warning is often paraphrased this way: “The joint must survive the environment, not merely the laboratory test.” That principle guides the seven tips in this article. The discussion will examine cure wavelength, shadowed areas, viscosity, bond strength, temperature resistance, substrate compatibility, and quality control. It will also question a common assumption: faster curing is not always better curing. A rushed line can create undercured edges, trapped stress, or weak interfaces. Small tests help. Realistic tests help more. When choosing a Curing Adhesive, manufacturers should compare technical data with actual production conditions, supplier support, and long-term reliability. Some decisions remain imperfect. That is normal. The goal is not a perfect adhesive on paper, but a dependable bond in service.

7 Tips for Choosing the Right Curing Adhesive?

What Is Curing Adhesive and How Does It Work?

Curing adhesive is a material that changes from a wet or workable state into a solid bond. This change is called curing. Unlike simple drying, curing often involves a chemical reaction. The adhesive molecules link together and form a stronger internal network. Some formulas cure through moisture, heat, light, or a second component. The required trigger depends on the adhesive and joint design.

Moisture-cured adhesive reacts with water vapor in the surrounding air. A two-part adhesive begins curing when its resin and activator are mixed. Light-cured adhesive hardens when suitable light reaches the bonding area. Hidden sections may remain soft if the light cannot penetrate. Heat can speed curing, but excessive heat may damage plastic parts or distort thin materials. Timing matters. The surface may feel firm before the deeper layer has fully cured.

Choosing the right curing adhesive requires more than checking its final strength. Examine the substrates, surface cleanliness, joint gap, temperature, flexibility, and exposure to water or chemicals. A practical test should measure working time, handling strength, and full cure time. A fast cure is not automatically better. That assumption can fail. Poor surface preparation can weaken even a technically excellent bond. In real assembly work, small variations in humidity or mixing ratio can change results. Record these conditions during testing, and question any result that seems unusually perfect.

How to Match Adhesive Types to Materials and Applications

Choosing the right curing adhesive starts with matching its chemistry to the materials. Metals conduct heat quickly, while plastics may soften or release additives. Glass is smooth, but it can fail when the bond absorbs stress poorly. Check whether each surface is porous, oily, flexible, or moisture-sensitive. Clean a small test area and observe wetting before making a decision.

Epoxy suits rigid assemblies that need strength and gap filling. Acrylic adhesives often work well when impact resistance and faster handling matter. Silicone remains useful for flexible joints, sealing, and temperature movement. UV-curing adhesives can provide rapid fixing, but light must reach the full bond line. Anaerobic products need close-fitting metal parts and limited air exposure. These descriptions help, but they are not universal rules.

Application conditions deserve equal attention. Measure the bond gap, operating temperature, vibration, and expected load. A thick adhesive layer may cure unevenly or shrink unexpectedly. Review the technical data sheet, including fixture time and full-cure time. Then test the actual materials under realistic conditions. A short laboratory test can reveal poor adhesion, trapped air, or surface contamination. Do not trust a fast cure alone. Speed can hide weakness. A careful choice may still need adjustment after the first trial, especially when plastics, coatings, or changing temperatures are involved.

7 Tips for Choosing the Right Curing Adhesive: How to Match Adhesive Types to Materials and Applications
Tip Key Selection Factor Suitable Adhesive Type Compatible Materials Typical Applications Curing Conditions Important Limitations
1 Match the adhesive to the substrates Epoxy Metals, ceramics, glass, wood, and many rigid plastics Structural assembly, electronic components, tooling, and equipment repair Usually cures at room temperature; heat can accelerate curing. Two-part systems require accurate resin-to-hardener mixing. Rigid after cure, so it may be less suitable for joints exposed to substantial movement or impact.
2 Consider the size and depth of the bond line Polyurethane Metals, wood, concrete, coated surfaces, and selected plastics Large-area bonding, panels, construction components, and transportation interiors Moisture-curing or two-part formulations are available; cure speed depends on moisture, temperature, and joint thickness. Some grades may foam or expand, and long-term resistance to high temperatures can be lower than that of certain epoxies.
3 Check whether the joint must flex or absorb vibration Silicone Glass, ceramics, metals, many coated surfaces, and some plastics Sealing and bonding in lighting, appliances, glazing, and assemblies exposed to movement Most one-part grades cure with atmospheric moisture; cure rate is affected by humidity, temperature, and joint geometry. Generally lower structural strength than rigid epoxies; some grades have limited paintability or adhesion to low-energy plastics.
4 Evaluate production speed and cure equipment UV- or light-curing adhesive Glass, transparent plastics, ceramics, and some metals when light can reach the bond area Optical components, small assemblies, displays, and high-throughput manufacturing Cures rapidly when exposed to the correct wavelength and sufficient light intensity. Requires light access to the adhesive; shaded areas and opaque substrates may remain uncured unless the formulation includes a secondary cure mechanism.
5 Match cure behavior to the manufacturing process Anaerobic adhesive Close-fitting metal parts, especially threaded or cylindrical assemblies Thread locking, retaining bearings, sealing pipe threads, and preventing metal-to-metal loosening Cures in the absence of oxygen and in contact with active metal surfaces; activators may be needed for inactive metals or large gaps. Not generally intended for open, porous, or large-gap bonds; performance depends strongly on joint fit and surface activity.
6 Assess surface energy and surface preparation Cyanoacrylate Many metals, rubber, ceramics, and selected plastics with close-fitting surfaces Fast repairs, small components, wire tacking, and precise spot bonding Moisture on the surface initiates rapid curing, often within seconds to minutes depending on the formulation and joint conditions. Usually performs best in thin bond lines; can be brittle, may show whitening on some surfaces, and may have limited resistance to prolonged heat or moisture.
7 Verify environmental and safety requirements Acrylic or methacrylate adhesive Metals, composites, many plastics, and painted or coated substrates Vehicle components, composite structures, outdoor assemblies, and applications needing impact resistance Two-part systems typically cure at room temperature; some formulations tolerate less-than-perfect surface preparation. Odor, flammability, exotherm, and surface compatibility vary by formulation; production areas may require ventilation and appropriate personal protective equipment.

How to Evaluate Cure Methods, Speed, and Equipment

Choosing the right curing adhesive starts with the cure method, not catalog promises.

Compare UV, heat, moisture, and dual-cure systems against the substrate and joint design. UV curing is fast, but opaque parts can leave uncured pockets. Heat may improve conversion, yet it can distort plastics or damage sensitive electronics. Moisture curing suits some enclosed assemblies, although humidity and bond depth affect timing. I have seen schedules fail because teams tested adhesive drops instead of real joints. Test the assembly.

Measure speed at the bond line. Record tack-free time, handling strength, and final strength separately. A lamp may show curing in seconds, while the center remains weak. Use witness samples with the same gap, surface finish, and component thickness. Check temperature with a probe, not a display alone. Small differences matter.

Ask whether production needs immediate handling or complete cure. These are different targets. Build a test matrix for dose, distance, exposure time, and temperature. My first trial often looks too optimistic.

Equipment selection should follow measurable process needs.

For light curing, verify wavelength range, intensity stability, coverage, shielding, and maintenance records. For thermal curing, confirm chamber uniformity and ramp control. For moisture systems, monitor humidity and airflow.

Include calibration intervals, operator access, ventilation, and failure alarms. A cheaper setup may cost more when rework rises. Keep records for every batch. Do not rely on one successful result. Recheck the process after storage, cleaning, or fixture changes. That extra test can expose an inconvenient weakness.

How to Compare Strength, Durability, and Environmental Resistance

Choosing a curing adhesive requires more than reading the highest strength value on a data sheet. Compare the test method, substrate, cure time, and temperature behind that number. Lap-shear strength suits overlapping joints, while peel and tensile tests reveal different weaknesses. Ask whether the reported result matches your actual joint design. Numbers can mislead.

Check bond strength after full curing, not only after initial handling. Examine durability through heat cycling, vibration, moisture exposure, and repeated loading. Watch for creep when the joint carries a constant load. Review resistance to oils, cleaning agents, salt, and ultraviolet light if the assembly faces them. Confirm the adhesive cures consistently across the joint, because thick areas may remain soft. Measure working time against your production speed. Verify surface preparation requirements, including cleaning, abrasion, and primer use.

Use samples made from the actual materials, not convenient substitutes. Test them at low and high temperatures, then inspect cracks, whitening, debonding, or loss of flexibility. Independent laboratory data and recognized ASTM or ISO methods improve confidence, but they cannot replace application testing. In practical evaluations, I have seen a strong adhesive fail because moisture entered an unsealed edge. That result deserves reflection. Selection should also consider storage life, mixing accuracy, and operator variation. A small process error can outweigh impressive laboratory strength. Keep test records, including cure conditions and failure locations, so future decisions rely on evidence rather than assumption.

7 Tips for Choosing the Right Curing Adhesive

How to Compare Strength, Durability, and Environmental Resistance

The chart compares common curing adhesive families using a typical engineering index from 0 to 100. Strength reflects representative cured lap-shear performance, durability reflects long-term property retention, and environmental resistance reflects tolerance to moisture, temperature variation, chemicals, and outdoor exposure. Actual results vary with formulation, surface preparation, joint design, cure conditions, and operating environment.

How to Check Safety, Compatibility, Cost, and Supplier Support

7 Tips for Choosing the Right Curing Adhesive

Safety should be checked before performance claims. Request the current safety data sheet, technical data sheet, and curing instructions. Confirm ventilation, skin protection, storage temperature, and disposal requirements. Follow workplace chemical-handling rules in your region. Ask whether the adhesive releases heat or vapors during curing. Small details matter.

Compatibility requires more than matching two material names. Test the adhesive on your actual metals, plastics, glass, coatings, or composites. Check surface energy, moisture, oil residue, and cleaning methods. Measure bond strength after heat, humidity, vibration, and aging exposure. Confirm the cure schedule fits your production equipment. I once trusted a familiar substrate description too quickly. That shortcut created uneven bonding. Do not repeat it.

Calculate total cost, not just the price per cartridge. Include waste, mixing nozzles, labor, equipment changes, testing, and storage losses. Compare usable life and cure speed carefully. A cheaper adhesive may increase rework. Ask suppliers for batch traceability, certificate options, sample quantities, and technical response times. Reliable support includes clear troubleshooting, stable specifications, and documented change notifications. Request evidence, not optimistic promises. Keep written test records, even when early results look excellent. Supplier support can be helpful, but your process data remains the stronger authority.

Find the Right Repair Product for Your Project

Need to find the most appropriate product for the needs of your project? We can help because we have over 70 years of experience servicing the industry with every kind of project, from Do-it-yourself projects to large skyscrapers. Package Pavement has the experience, the knowledge and the products to help every project succeed.

Quikrete Repair Products
Legend
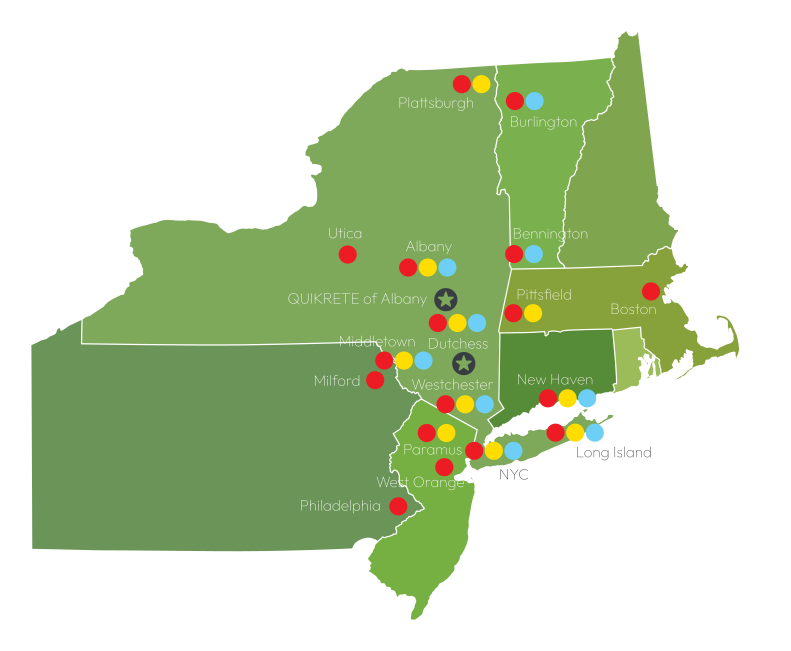
Package Pavement has two convenient locations in Stormville, NY (Dutchess County) and Ravena, NY (Greene County) to serve the Northeastern Region with bagged concrete, blacktop, mortar, and repair products. This map gives a general idea of where we service and the product lines we offer.
Package Pavement Products
Quikrete Products
Spec Mix Products
map

Our Brands Websites